MP0: Target Mode
Welcome to the machine project! As described in the syllabus, the MP gives you practice applying your skills to a large project similar to the ones you will work on in the future. In this way it nicely complements the practice you get on the much smaller and more contained homework problems.
So while much of this first checkpoint involves writing small pieces of code similar to recent homework problems, you’ll be integrating them into a large software project: a complete Android app. When you’re done the app will do something new and cool as the result of your efforts.
The overall machine project (MP) is broken down into individual checkpoints. We’ll refer to them like this: MP0 for the first checkpoint, or MP4 for the fifth checkpoint 1.
1. Getting Started with MP0
In MP0 you’ll begin transforming the Spring 2020 CS 125 App into a fun and fully-working game.
For MP0 you’ll turn the starter code into a single player version of a target mode game on some targets we’ve selected with a constant proximity threshold. A complete description of the CS 125 Spring 2020 App follows below.
1.1. MP0 Deadline and Deadline Groups
Deadlines for each checkpoint vary based on your deadline group. The first checkpoint (MP0) deadline is as follows:
-
11:59PM on Sunday 2/16/2020 for the Blue Team, all labs starting at 3PM or earlier (9, 10, 11AM, 12, 1, 2, and 3PM)
-
11:59PM on Monday 2/17/2020 for the Orange Team, all labs starting at 4PM or later (4, 5, 6, 7, and 8PM)
In addition, 10% of your grade on MP0 is for submitting code that earns at least 40 points by 11:59PM on Sunday 2/9/2020 (Blue) or Monday 2/10/2020 (Orange). Late submissions will be subject to the MP late submission policy.
1.2. Learning Objectives
The core objectives of MP0 are both to keep you practicing writing simple functions and to get you started working with Android. Specifically, this checkpoint trains you to:
-
work with variables and arrays of appropriate types
-
perform simple operations on numeric values
-
use simple loops and conditional statements to process data in arrays
-
translate specifications into working code, and
-
work with test suites as part of your development process.
1.3. Assignment Structure
The machine project is a single Android app that you will continuously improve throughout the semester. Like all Android apps, it consists of Java code plus Android-specific resources.
Moderate-to-large software projects organize their code into multiple Java code files. You’ll typically only work with a few to complete each checkpoint. Some you won’t need to modify at all.
Most of the points on MP0 come from implementing well-defined Java functions like you’re starting to do on the homework.
Connecting those to the game to make the app start to work takes less code, but you will need to spend some time looking over the code we’ve provided as you get oriented. We’ve included some helpful comments to summarize what’s going on and point you in the right direction.
While the comments in the files you need to work with should explain everything you need to know, you can also examine our official online documentation if you’re curious what each function and class does.
1.4. Android Studio Setup
Before starting the MP you must complete setting up Android Studio and have either an emulator or real device that you can run Android apps on. If you are struggling with this, please come to office hours for help—or post on the forum in the Android Studio category.
1.5. Obtaining and Submitting MP0
You’ll obtain the MP using GitHub—a very popular site that computer
scientists use to share their work.
So, first, if you don’t have one already,
sign up for a GitHub account.
Note that if you sign up with your @illinois.edu email address there are some
free goodies thrown in.
Next, use this GitHub Classroom link to create a copy of the repository containing the MP starter code. Once your repository has been created import it into Android Studio following our Git workflow guide.
At this point cool your jets for a minute while Android Studio finishes synchronizing and indexing your new project. Once that’s finished, double-check that everything is ready to go by opening the File menu and choosing Sync Project with Gradle Files.
Note that when you open the project in Android Studio you may receive a warning about "Gradle KTS Build Files." This is normal, and you can safely ignore this warning.
For a complete description of how to submit your work for CS 125, please consult the workflow section of our Git guide. The screencast above also provides an overview of the process.
First make sure you’ve identified yourself in your repository by entering your Illinois
email address into the email.txt file in the outermost folder of the project.
Whenever you make progress you want to save, you should be making a Git commit (VCS | Commit). Commits only exist on your computer until you push them (VCS | Git | Push). Every time you push your MP, we grade the checkpoint you’re currently working on. Official autograding takes just a few minutes, then you’ll be able to see results on the MP grade page.
1.6. MP0 File Structure
You can visually access the Android Studio project structure by pressing the Project button (with the Android Studio icon) on the left side of your screen, which opens the file ribbon on the left side of your screen.
By default, Android Studio will open Android files on the ribbon.
To see all of the .java files for the MP (the ones you will be writing in), go
to the top of the ribbon, click on the Android dropdown, and select
Project.
Now you’re in project view mode, where you can see all of the main and test
files!
You’ll also notice a logic directory while in project view mode; this folder
contains a number of Java files that define and determine the app’s game logic
and functionality.
The Java files outside of this logic are primarily Android activity files that
pertain to the design of the app.
You will need to edit logic/TargetVisitChecker.java, as well as
GameActivity.java in order to complete Checkpoint 0.
2. The Spring 2020 MP App
The app we’re building this semester is a game inspired by Ingress, and represents a fusion of the virtual and real worlds enabled by ubiquitous powerful mobile computing devices—also known as smartphones.
In the screencast below Amirtha provides a great overview of the app, including an introduction into its structure.
2.1. Intro to Android
Android is a Java-based framework for building smartphone apps that run on the Android platform. By learning how to build Android apps, your programs can have enormous impact. Last year Google estimated that there were 2.5 billion active Android devices. That’s one out of three people on Earth—and several times more than iOS.
However, Android is also a huge and complex system. It’s normal to feel lost when you are getting started. Our best advice is to just slow down, take a deep breath, and try to understand a bit of what is going on at a time. We’ll try to walk you through a few of the salient bits for MP0 below and in comments in the starter code. Google also maintains a great set of tutorials on beginning Android development.
Note that you will use Android for all of the MP this semester and for your final project, so put in some time to familiarize yourself with it now. It’s simply the best way to build exciting things—programs that you can share with your friends and family, and that might just change the world.
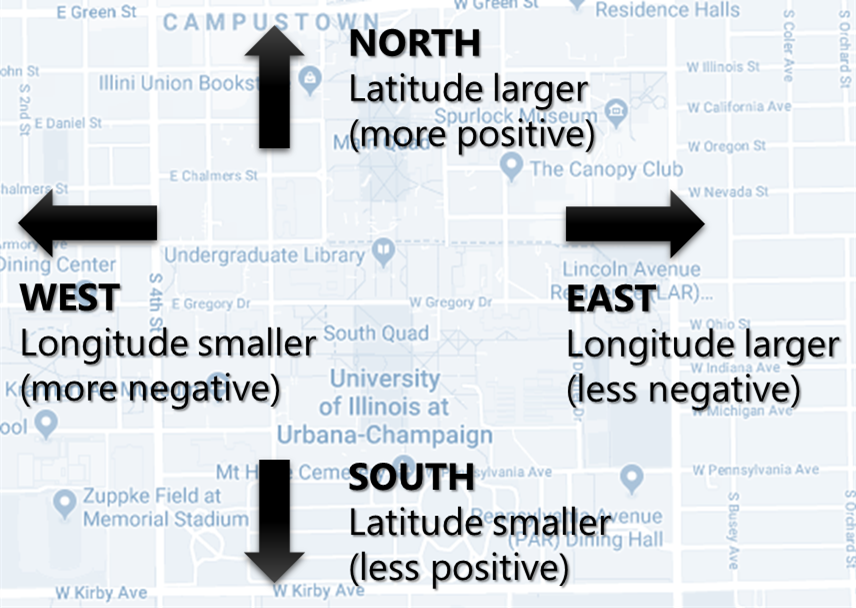
2.2. Understanding the Coordinate System
Since the app is a location-based game, it will be useful for you to understand location coordinates, especially when testing your app on a phone or emulator. Digitizing a position on the Earth turns a location into numbers that computers can manipulate, and is what gave rise to smartphone-based navigation, ride sharing, and self-driving cars.
Locations are expressed as latitude-longitude (sometimes called "lat-long" or
LatLng) pairs.
You’ll often see them written as comma-separated coordinate pairs, longitude
first.
Latitude is defined relative to the Earth’s equator and specifies how far north or south you are. Longitude is defined relative to the Prime Meridian and specifies how far east or west you are. One increment of longitude is not the same physical distance as the same increment of latitude. The distance between adjacent meridians (a change of 1 in longitude) is different at different latitudes. At the small scales we’ll be working with, however, the curvature of the Earth can be ignored.
You may find this figure helpful:
2.3. Target Mode, Area Mode, and the Snake Rule
In Campus Snake teams compete to capture real-world objectives by visiting them before opposing teams. The objectives may be specific locations—target mode—or cells on an evenly spaced rectangular grid—area mode.
But there’s a twist: the snake rule. After a player has captured multiple objectives, the path between them forms a line. These paths are not allowed to intersect. Visiting a target will not claim it if doing so would add a line that crosses an existing line.
In target mode, the proximity threshold is how close a player must get to a target to capture it. When the app is finished, players and observers in a game will be shown a map depicting claims and players' locations. A game creation screen will allow specifying the objectives and inviting participants.
3. Completing Checkpoint 0
When you’ve finished Checkpoint 0, the app should display a marker on the map at each target’s position. When the user moves within the proximity threshold of a target and it can claimed without violating the snake rule, the target should turn green. Capturing a target should add a green line between it and the previously captured target—if it exists.
In the following screencast Ben demonstrates how the app should work in the emulator:
3.1. Your Tasks
This sounds like a lot to do!
But you can enable these features by completing these helper methods in
TargetVisitChecker.java:
-
isTargetWithinRange: given a target, determines whether that target is within range to be captured based on the user’s current location -
isTargetVisited: checks that the given target wasn’t already captured before -
getVisitCandidatefinds an unvisited target within a specified range of the user’s current location -
checkSnakeRule: determines whether a specified target can be claimed without violating the snake rule: that is, without creating a line that would cross an existing line between two previously claimed targets -
visitTarget: updates a path array to reflect that a specified target has been visited, returning the updated index of the array
When your helper functions are ready, you can use them to make the app do something.
The Java file controlling the game/map screen is GameActivity.
You need to fill out two functions:
-
setUpMap: place all the target markers initially at the start of the game -
onLocationUpdate: react to user movements; as noted in the comments, some relevant variables are declared and initialized for you near the top of the file.
The LineCrossDetector file is already written for you and correctly determines
whether two lines cross, BUT it has some checkstyle issues that need to be
corrected.
See the section on style later in this writeup.
3.2. Test-driven Development
We verify the correctness of your code on each checkpoint with a test suite, a Java file containing code that runs what you’ve written to compare your results with our expected ones.
The only test suite you’ll see right now is Checkpoint0Test. Each test suite contains several test functions, each of which tests one aspect
of your app.
For example, our testVisitTarget function verifies the correctness of your
visitTarget function.
You can use the test suites to perform iterative test-driven development.
-
Start with one graded task that you need to accomplish—for example, implementing
isTargetVisited. -
Run the current checkpoint’s test suite, "Test Checkpoint 0," from the dropdown at the top near the green run button. Tests for parts you haven’t started working on yet should fail.
-
Begin working on the function. When you think you have a solution, re-run the test suite. You can run just one test by using a run button in the left margin of a test suite’s code.
-
If the test suite succeeds, you’re almost done—congratulations!
-
Make sure to run the full autograder to ensure you got all the points you expected. There are a few points for code style, described further below.
When a test suite fails, try to diagnose the problem by looking at what inputs caused your function’s behavior to diverge from what was expected.
-
If your app didn’t crash but produced incorrect results, the error will say what it expected.
-
If your code crashed, the error message will show what problematic operation was attempted and what line of your code directly caused it.
Either way, the error message also includes what line of the test suite was reached when the problem was hit. You’re not expected to fully understand the test suites, but reading their code may provide some clues about what’s going on in the case that your submission fails.
3.3. Getting Help
The course staff is ready and willing to help you! If you need help, please come to office hours early and often, or post on the forum in the category we’ve created for MP0 questions. You should also feel free to help each other, as long as you do not violate the academic integrity requirements.
3.4. Writing and Testing Code
In general, the fewer lines of code you write before running a test, the better. This is not just a rule for beginners—experienced programmers spend a lot of time writing tests, in fact probably more than when they were learning.
When you are starting out, it is easy to introduce bugs into your code. Bugs are easiest to catch one-by-one, and so the fewer lines of untested code, the more likely you are to identify errors in your logic or implementation.
If you receive a "no tests were found" error when trying to run the test suite, open the File menu and choose Sync Project with Gradle Files, then try again. If that doesn’t help, see the Troubleshooting Android Studio section below.
3.5. Compile Errors
Before a program can be run, it must be compiled from your source code into something that can be executed. We’ll talk a bit more about this later in the semester. Problems in this stage are compile errors, indicating that your code has a mistake—often a syntax error—that makes Java unable to understand or permit what you’re trying to do. They’re flagged with red squiggles in the code editor or shown in a window like this:
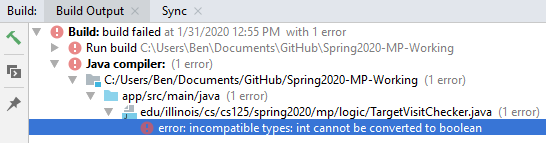
There are several kinds of errors you may encounter as you work on the project. Distinguishing between them will help you fix them. Remember: programmers never stop making mistakes. They just get better at fixing them.
You can usually double-click the error to jump to the code where Java identified the problem. However, unbalanced curly braces can make Java think the structure of your code is very different than you intended.
If you suddenly receive tons of compile errors, look before the start of the problems to see if you have an extra or missing curly brace. This is one of many things that proper indentation helps with.
3.6. Runtime Errors
If compilation succeeds but the program tries to do something impossible or disallowed, that’s a crash—a runtime error. The test output pane marks the crashed test with a red icon and tells you went wrong and what line of code caused the crash. For example:

The first line states the problem, in this case that code tried to access the
out-of-bounds index -1 of an array.
What follows is called a stack trace.
The direct cause of the crash is at the top—in this case the
isTargetVisited method of TargetVisitChecker—and the rest of the
stack trace describes how the code reached this point.
Helpfully, the stack trace also includes the line number of the code that
crashed.
You can click the underlined link to jump right to that line.
The other lines are the chain of function calls that led to the crashing
function.
In this case, isTargetVisited was called by line 289 in
Checkpoint0Test's invoke function, which was called by an access$300
function attributed to line 285 2, which was called by line 302
in testIsVisited.
Usually you want to investigate the first stack trace entry that mentions your
code, but finding what the test suite was trying to check when your code crashed
may also provide some clues.
As you continue to write more complex code, stack traces will frequently lead you from the place where the problem manifested itself to the real cause.
Finally, it’s common for code to cause no crashes but produce incorrect results. When these logic errors are detected, the test output pane marks the failed test with a yellow icon and displays a report similar to one from a crash. However, since your code finished executing but just returned a wrong result, only the test code which found the problem will be on the stack trace. Often the message will specify the expected (correct) value and the actual (your code’s incorrect) value. You can jump to the complaining line of the test suite to get more context and see what call(s) it made to your code.
3.7. Troubleshooting Android Studio
Compiling Android apps is a complex process and several things can and will go wrong. If your app won’t compile or Android Studio seems to be misbehaving, try these fixes one at a time:
-
File | Sync Project with Gradle Files: This causes Android Studio to reexamine the numerous components of the project and often fixes "no tests were found" errors.
-
Build | Rebuild Project: If there are errors in your code that are preventing it from compiling, this may bring up a useful list of them.
-
Restart Android Studio: Sometimes things just need to be turned off and back on again. Really.
-
File | Invalidate Caches / Restart: This will bring up a dialog with several options, from which you should choose "Invalidate and Restart" for the most complete refresh. However, note that Android Studio will busy itself after it restarts indexing your project.
4. Grading
MP0 is worth 100 points total, broken down as follows:
-
10 points for
isTargetWithinRange -
10 points for
isTargetVisited -
10 points for
getVisitCandidate -
20 points for
checkSnakeRule -
10 points for
visitTarget -
20 points for making the single player target mode game work (by amending functions in
GameActivity) -
10 points for fixing all
checkstyleviolations -
10 points for submitting code that earns at least 40 points by 8 PM on your early deadline day
4.1. Test Cases
Automated testing is a hugely important part of modern software development. Just like computers are good at running programs, they are also good at running programs to debug other programs. Independently developing a method and the function that tests it allows the two to support each other. The test may find errors in the method, and the method may also identify errors in the test.
Testing simple Java functions is relatively straightforward: we invoke your code with some chosen inputs and compare the output to the known-correct result. Testing Android UIs, however, is more difficult. This semester we will use Robolectric to test your app code in a Java environment that simulates Android.
For the first checkpoint we test each of the three helper functions with some
simple manually designed test cases, then exhaustive test cases using many
randomly generated inputs.
Since each test function stops as soon as it detects a problem, we placed the
simple cases first so you can use them during iterative development.
In particular, some simple cases in testSnakeRule have diagrams that visually
show why the expected answer is correct.
4.2. Autograding
We have provided you with a local autograder that you can use to estimate your current grade on your own machine as often as you want. Your Android Studio project contains a run configuration called "Grade" that will run the autograder for the current checkpoint. You can also run the grader by installing our plugin and then pressing the button that looks like the CS 125 shield.
Before your grade your checkpoint you will need to identify yourself by entering
your @illinois.edu email address into the email.txt file located in the root
project directory.
The autograder will not run until you do this.
Please make sure to get this right!
If you don’t, your results will not be visible on the grading page, and may be
attributed to another student—putting you at risk of an academic integrity
violation.
Unless you have modified the test suite or autograder configuration, the autograding output should approximate the score that you will earn when you submit. If you modify our test cases or the autograding configuration, all bets are off. You may also lose points if your solution runs too slowly and exceeds the testing timeouts.
4.3. Style Points
Most of the points on each checkpoint are for correctly implementing the required functions. The other 10 points are for style. Writing readable code according to a style guideline is extremely important, and we are going to help you get into this habit right from the start. All software development companies and most active open-source projects maintain style guidelines. Adhering to them will help others understand and integrate your contributions.
We have configured the checkstyle plugin to enforce a variant of the
Sun coding style.
Android Studio should naturally produce formatting that meets this standard.
So you shouldn’t have to fight with it too much to avoid checkstyle violations.
For ease of finding style problems, Android Studio flags them with red squiggles
under code and with red tick marks on the scrollbar.
You can hover your mouse over such indicators to get more details on what
checkstyle is complaining about.
You will also get a full list of checkstyle errors at the top of the grading
output.
You may find these requirements a bit annoying at first, but we trust that you will get used to them. Once you build good style habits, you won’t have to think about them anymore, and will just go on writing beautiful code.
5. Cliffhanger
After completing MP0 you may be thinking that dealing with locations as multiple arrays is unwieldy. You’re right! You’ll soon learn a better way to handle pieces of related data, and in a future checkpoint you’ll revisit the code you wrote here to apply that technique. And of course there are plenty of other new features to implement, like area mode which we’ll tackle next checkpoint.
5.1. Complete App Demo
If you can’t wait to see how the app will work when you’re done with the MP, you
can set our module manager to use all of our provided libraries.
There’s a file called grade.yaml in the root of the project that will be used
in later checkpoints to indicate what you’re currently working on, but if you
change its checkpoint setting from 0 to demo and its useProvided setting
from false to true then do File | Sync Project with Gradle Files, building
and running the app will produce our solution.
(The Gradle sync step is important! Without that, very strange behavior will
occur.)
Make sure to change those settings back and Gradle sync again before trying to
grade or submit, since you don’t get points for grading our known good solution.
6. Cheating
Please review the CS 125 cheating policies.
All submitted MP source code will be checked by automated plagiarism detection software. Cheaters will receive stiff penalties—the hard-working students in the class that are struggling honestly for their grade demand it.