Warning: Outdated Content
This MP is from a previous version of CS 125. Click here to access the latest version.
MP2: Web APIs
In MP0 and MP1, you implemented both game modes for a singleplayer version of the Campus Snake 125 game. This checkpoint starts making the app multiplayer by connecting it to an authentication service and our central game server.
To make the multiplayer game work, users will need to be able to identify themselves to the app and to a central server that relays information between users. Displaying data from the server first requires fetching it. Services designed to make information accessible to other machines, like our central server, expose a web API that programs can contact in a structured manner to receive structured information.
Now that you know how to create and use objects, you can take advantage of an incredible number of existing pieces of software, often referred to as libraries), to easily add features to your program. This checkpoint uses Google’s Firebase Authentication, Gson, and (indirectly) Volley libraries to let the user log in and respond to game invitations.
As usual, deadlines for each checkpoint vary by your deadline group. MP2 is due at:
-
8 PM on Sunday 10/20/2019 for the Blue Group: all labs starting at 2 PM or earlier
-
8 PM on Monday 10/21/2019 for the Orange Group: all labs starting at 3 PM or later
Since MP2 is another multi-week checkpoint, 10% of your grade on it is for submitting code that earns at least 40 points by Sunday 10/13/2019 (Blue) or Monday 10/14/2019 (Orange). Late submissions will be subject to the MP late submission policy.
1. Learning Objectives
MP2 introduces two major skills that will be extremely useful for your final project and in software development in general. You will:
-
Integrate existing libraries into your application to provide functionality to your users without needing to implement all those features yourself
-
Access data from a web service according to a web API specification
We’ll keep making use of your imperative programming, object-oriented programming, and Android UI skills exercised in previous checkpoints.
2. Assignment Structure
You already have the one MP repository you’ll be working on and are familiar with the relevant parts of the folder structure. You just need the test suite for Checkpoint 2.
2.1. Obtaining MP2
Like for MP1, we distribute the new MP2 files in a patch. To apply it and begin working on the checkpoint, follow these steps:
-
Commit your work just in case you run into any problems applying the patch.
-
Download the patch file.
-
In Android Studio, do VCS | Apply Patch.
-
Select the downloaded patch file and press OK to apply it.
-
Change the
checkpointsetting ingrade.yamlto2. -
Do File | Sync Project with Gradle Files.
The Grade task should then grade Checkpoint 2. A new run configuration called Test Checkpoint 2 will run the Checkpoint 2 test suite. If you run into a problem obtaining MP2, please get help immediately.
2.2. Late MP1 Submissions
If you didn’t finish MP1 or even MP0, you can still do MP2.
Setting useProvided in grade.yaml to true will make the app use our
AreaDivider class, GameActivity logic, and singleplayer game setup UI
1.
Our provided logic cannot suppress MainActivity's original behavior of immediately
launching GameActivity, but if you remove the original startActivity and finish calls
our provided version will add the Create Game button as needed.
Other than that, MP2 can be graded completely independently from MP0 and MP1.
If you want to finish up MP1 before starting MP2, consider holding off on applying the MP2 patch because the new test suite will not be able to compile until an activity introduced in MP2 is added to the project.
If you want to go back later and work on a late submission of a previous checkpoint,
you can change the checkpoint setting back to the number of the checkpoint you would like to
have graded.
3. Android
You already know a lot about Android activities and UI from previous checkpoints. Here we introduce some extensions to that knowledge that will allow you even more flexibility in building apps.
3.1. Getting Results from Activities
You previously launched other activities by passing an Intent to the startActivity function.
Sometimes the activity you launched needs to return the user to your activity once some data
has been produced. For example, when you go to attach a picture to a text message, your phone
takes you to a camera or gallery screen; once you take or select a picture, you’re taken back
to the texting screen which received the chosen picture.
To start an activity that you need to get a result from, use the startActivityForResult
function. It takes the intent specifying the activity to launch and a numeric request code
of your choice that is useful in case your activity issues multiple different requests.
For example:
// Suppose intent is an Intent variable and MY_REQUEST_CODE is an int constant
startActivityForResult(intent, MY_REQUEST_CODE);
When the activity finishes and produces its result, the Android system calls the original activity’s
onActivityResult function to deliver the result. To act on that notification, you need to
override onActivityResult (similar to how all activities override onCreate to do something
when they are created):
/**
 * Invoked by the Android system when a request launched by startActivityForResult completes.
 * @param requestCode the request code passed by to startActivityForResult
 * @param resultCode a value indicating how the request finished (e.g. completed or canceled)
 * @param data an Intent containing results (e.g. as a URI or in extras)
 */
@Override
protected void onActivityResult(final int requestCode, final int resultCode, final Intent data) {
    super.onActivityResult(requestCode, resultCode, data);
    if (requestCode == MY_REQUEST_CODE) {
        // Do something that depends on the result of that request
    }
}
3.2. Inflating Layouts
You previously used the UI designer to add UI to activity layouts. It is also possible for layout resources to contain smaller, repeatable pieces of UI rather than entire screens' worth. For example, the email app on your phone has a chunk of UI repeated for each email in your inbox, containing text views for the sender, subject, send time, and possibly more. Like how functions allow us to break up our programs into manageable, reusable pieces, layouts allow organization and reuse of user interface elements.
To create a layout file without an associated activity, right-click the layout folder under
res and select New | Layout Resource File. Our convention for small layout "chunk" resources
is that their names begin with chunk_. Once you’ve created the resources, you can use the
UI designer to add views to it just like before.
Before your code can use the layout chunk, it must be inflated.
That turns the layout resource, specified by its R.layout constant,
into a hierarchy of views that can be manipulated as usual.
Much like setting an ID for a view produces a constant on R.id named the same as the ID,
creating a layout resource produces a constant on R.layout named the same as the file.
For the chunk to be laid out properly, its future parent view—the container that it will
be added into—should be specified.
// Suppose parent is some kind of container that will hold this chunk
View messageChunk = getLayoutInflater().inflate(R.layout.chunk_email, parent, false);
// If the last parameter was true, inflate would return parent
The return value of inflate is a View that represents the chunk as a group of views.
To get a reference to a specific view inside that copy/instance of the chunk, call the findViewById
instance method like before but on the chunk’s View:
TextView senderLabel = messageChunk.findViewById(R.id.sender);
// Do something with senderLabel...
3.3. Variable-Length UI
However, inflating a layout chunk does not add it to the current activity’s UI
2.
Usually repeatable chunks of layout will be used to display a variably sized list of things
in a container. Once you have a reference to a container like a LinearLayout,
you can add a chunk to it with addView:
// Suppose parent is the container specified as the parent for messageChunk
parent.addView(messageChunk);
If you want to remove all the entries in a container, you can call its removeAllViews function.
Adding repeatable UI to containers is often done in loops. For example:
LinearLayout parent = findViewById(R.id.emails_list);
for (Email email : inboxMessages) {
    View messageChunk = getLayoutInflater().inflate(R.layout.chunk_email, parent, false);
    TextView senderLabel = messageChunk.findViewById(R.id.sender);
    senderLabel.setText(email.getSenderName());
    // Do something with any other views in the chunk...
    parent.addView(messageChunk);
}
3.4. Accessing Resources
To make it easier to translate apps into different languages, Android considers it good practice
to put user-facing strings of text in string resources in res/values/strings.xml
rather than hardcoding them as string literals in your Java files.
We don’t impose that as a requirement, but you will find it helpful
to be able to access string and string array resources.
The object returned by the getResources function of activities grants access to the app’s
resources. The value of string resources identified by their R.string constants
3
can be accessed with getString:
String appName = getResources().getString(R.string.app_name);More relevant to the MP, string arrays can be accessed with getStringArray
by their R.array constant:
String[] teamNames = getResources().getStringArray(R.array.team_choices);If you’re curious, you can see Android’s official
Resources documentation
for more information.
4. Web API
API stands for Application Programming Interface. An API specifies the structure or contract for communication between applications. When using an API you don’t need to be concerned about how the service is implemented. You just need to properly submit a request and understand the response.
Here and for your final project we are most interested in web APIs, which are accessed
over the Internet using standardized web protocols.
The most common Internet protocol is
HTTP,
Hypertext Transfer Protocol.
Each HTTP request specifies a document, method, and sometimes a body.
When browsing the web, the document specifies which page you’d like to look at.
When using an API, the document is often referred to as the endpoint and specifies
what function you would like the service to do for you.
The most common HTTP methods are GET and POST.
GET requests access data; POST requests make a submission, change something, or generally
take an action.
4.1. What is JSON?
In object-oriented languages, structured data can be modeled with classes. But servers and clients can be written in many different languages with wildly varying conceptions of how data should be laid out, so for the response data to be transferred between them, it must be written in (serialized into) a mutually understandable format that correctly conveys the structure of the information.
JSON has become an extremely common format
for exchanging data on the web. JSON is text that describes a hierarchy of objects and their
properties. A Google Maps LatLng object might be represented like this in JSON:
{
  "latitude": 40.109187,
  "longitude": -88.227213
}
Curly braces surround the contents of a JSON object. Each property (which corresponds to a variable in Java) has a quoted name before the colon and a value after. Values can be numbers, strings, booleans, objects, or arrays 4.
Here’s a more complicated JSON object partially representing a class:
{
  "name": "CS 125",
  "enrollment": 800,
  "location": {
    "name": "Foellinger Auditorium",
    "allows_food": false,
    "latitude": 40.105952,
    "longitude": -88.227204
  },
  "lecture_days": [
    "Monday",
    "Wednesday",
    "Friday"
  ]
}
There, the value of the location property on the root object is another object,
which has four properties of its own.
lecture_days on the root object is an array of the three strings
Monday, Wednesday, and Friday.
Arrays may contain any kind of value including objects or other arrays.
4.2. Using Gson
Virtually all languages in common use today have JSON libraries available, so you don’t have to parse the JSON text yourself.
For the MP we’ll be using Google’s Gson library to work with JSON.
We have added it to the project for you and provided helper functions that automatically
parse JSON received from our server into instances of Gson classes.
The classes you’ll be working with most are
JsonElement,
JsonObject,
and
JsonArray.
The Android SDK includes very similarly named classes like JSONObject (note
the capitalization).
You must use Gson; attempting to use other JSON libraries will fail during grading.
A JsonObject represents a curly-braced JSON object.
Its get method returns the value of a specified property as a JsonElement
(or null if the requested property was absent).
JsonElements have several methods to get the value as a specific type,
e.g. getAsInt interprets the value as an integer and returns a Java int.
For example, this snippet gets the class name and enrollment from the second example object
in the previous section:
// Suppose cs125 is a JsonObject variable
String className = cs125.get("name").getAsString();
int enrollment = cs125.get("enrollment").getAsInt();
Accessing values from nested objects requires getting a JsonObject for those nested objects first.
Trying to get the allows_food property on the root object would fail because it doesn’t exist
there, but this works:
JsonObject venue = cs125.get("location").getAsJsonObject();
boolean allowsFoodInClass = venue.get("allows_food").getAsBoolean();JsonArrays have a get method to get the value at the specified index,
but they are also iterable with the enhanced for loop like a normal array:
JsonArray lectureDays = cs125.get("lecture_days").getAsJsonArray();
for (JsonElement d : lectureDays) {
    String day = d.getAsString();
    // Do something with day?
}
4.3. Making Web Requests
We have provided a WebApi class with some functions that issue web requests
by using Google’s Volley library.
Web requests take a while, so rather than stalling the execution of your app,
Volley waits for the request’s completion in the background and runs a handler
when the response comes back. If the request failed for some reason (maybe the phone
isn’t connected to the Internet), Volley notifies a different handler of the error.
You can make a GET request from activity code like this:
WebApi.startRequest(this, WebApi.API_BASE + "/some/endpoint", response -> {
    // Code in this handler will run when the request completes successfully
    // Do something with the response?
}, error -> {
    // Code in this handler will run if the request fails
    // Maybe notify the user of the error?
    Toast.makeText(this, "Oh no!", Toast.LENGTH_LONG).show();
});
The first parameter is the Android context, which can just be the current activity instance.
The second is the URL to contact. In the MP, it should always be WebApi.API_BASE concatenated
with the endpoint you’d like to access. In the success handler, the response object will contain
the response data as a JsonObject if the endpoint returns a result, otherwise it will be null.
We don’t test for any specific error-related behavior, so your error handler can do anything
you think is reasonable.
To make a POST request, use the more complex overload of startRequest that allows
specifying the method and including a body. The method parameter can be either
Request.Method.POST or Request.Method.GET (imported from Volley).
For this checkpoint, the body parameter can always be null, since no data needs to be uploaded.
4.4. Our API Documentation
To use an API, you need to know what requests are valid and what format of data you get back. This section tells you the endpoints you need to contact and the structure of the JSON response.
The /games endpoint accepts GET requests and returns information on the games the
user is involved in or invited to. The resulting object has a single property called games,
which is an array. Each element of that array is an object with at least these properties:
-
id(string) is the game’s unique ID for use in other requests about that game specifically. -
owner(string) is the email address of the game’s owner/creator. -
state(integer) is theGameStateIDcode for the game’s current status. -
mode(string) is the game mode, either "area" or "target". -
playersis the array of all players, including the current user, invited to or involved in the game. Each object has at least these properties:-
email(string) is the player’s email. -
state(integer) is thePlayerStateIDcode for the player’s current status in the game. -
team(integer) is theTeamIDcode for the player’s team/role in the game.
-
You may find this example JSON response helpful.
Some of the values mentioned are numeric codes: integers that indicate different states,
like Android’s View.VISIBLE or View.GONE. Constants for game-relevant codes are provided
in the three classes in Constants.java. So e.g. rather than comparing against the magic number 2
to see if the game is over, compare against GameStateID.ENDED.
The following three endpoints accept POST requests regarding the user’s participation in
a specific game and return no information.
Replace GAME_ID in the endpoint with the game’s unique ID from the above results.
All will fail with an HTTP 404 error if the specific game does not exist.
-
/games/GAME_ID/acceptaccepts the invitation to the game. Will fail if the user does not have a pending invitation to it. -
/games/GAME_ID/declinedeclines the invitation to the game. Will fail if the user does not have a pending invitation to it. -
/games/GAME_ID/leaveleaves an ongoing game that the user previously accepted an invitation to. Will fail if the user already left or was never invited.
5. Your Goal
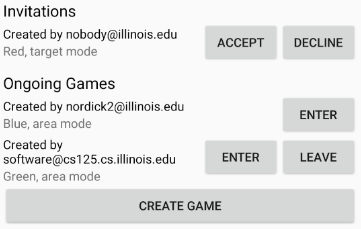
Once you finish Checkpoint 2, the app will start by requiring the user to log in. The main activity will show a list of invitations fetched from our central game server and allow the user to accept or decline them. It will also list ongoing games (accepted invitations) and provide UI to enter the game or withdraw from it.
While there may be slightly more lines of code necessary for MP2 than previous checkpoints, it should be more straightforward than MP1 if you read the above sections and refer to them as you apply their concepts to the project. As always, starting early and making steady progress is the best strategy to succeed on the MP.
5.1. Login Activity
Like when you first started Checkpoint 1, the test suites will not be able to compile immediately
after acquiring the new Checkpoint 2 files. You need to create the LaunchActivity activity,
which will become the app’s new initial/startup activity.
Right-click our package that contains all the Java files you’ve been working with and select
New | Activity | Empty Activity. Enter LaunchActivity in the Activity Name box, which should
automatically set the Layout Name to activity_launch. Make sure the Source Language is set
to Java, then press Finish to create the activity. If prompted to add the new files to Git,
do so.
While creating the activity, Android Studio may damage the build.gradle.kts file
under the app folder, causing script compilation errors.
If so, right-click that file in the Project pane and choose Git | Revert.
Make sure only the build.gradle.kts file is selected, then press Revert to restore
the correct version. If a "Gradle project sync failed" banner appeared at the top
of the code editor, click the "try again" link.
To change the app’s startup activity, we need to change the manifest, an XML file
that contains various registration and metadata about the app.
It is named AndroidManifest.xml, located directly inside the main folder.
We planned for you to move the <intent-filter> section from MainActivity's registration to
LaunchActivity's yourself, but due to an error in the Checkpoint 0 distribution process
we accidentally gave the Checkpoint 2 solution version of the manifest to some of you.
So in the interest of fairness,
here is the solution manifest
which you may simply copy-paste over the version in your repository.
If you’re curious, you can read
Android’s official manifest documentation.
We will be using Google’s Firebase Authentication service to display a login flow and
manage credentials.
We want the user to be sent directly to the main app if they’re already logged in,
but if not we will start the login process. So the onCreate logic will have this structure:
if (/* the user is logged in */) { // see below discussion
    // launch MainActivity
    finish();
} else {
    // start login activity for result - see below discussion
}
FirebaseAuth.getInstance().getCurrentUser() returns an object representing the authenticated
user or null if the user has not logged in. Checking it for null allows you to determine
whether the user needs to sign in. Later in this checkpoint you’ll find this object’s
getEmail() function useful for getting the current user’s email, which serves as their
identifier in the game.
If you’ve determined that the user needs to log in, you can start the Firebase Authentication UI
flow according to
this Google example
but with only email authentication enabled.
The example code assumes an RC_SIGN_IN constant ("request code for sign-in"),
which you may define as an integer of your choice or pick a different name for.
Either way, the value you pass to startActivityForResult will be passed as the request code to
onActivityResult when the login flow completes.
onActivityResult, as described in the Getting Results from Activities section,
will be called when the login flow is over whether or not the user actually signed in.
So onActivityResult will need logic to check that before proceeding to the main activity:
if (/* the result is from the login request */) {
    if (/* the user successfully logged in */) { // see below discussion
        // launch MainActivity
        finish();
    }
}
To see if the login flow was successful, you can either check the result code against
RESULT_OK like Google’s example does, or repeat the logic you used to determine whether
the user was signed in in the first place.
If the user canceled the login flow, they’ll see the LaunchActivity UI.
Use the UI designer to add a button with ID goLogin.
Feel free to caption this whatever you like and add any explanatory labels about
needing to log in to use the app.
Pushing the button should start the login process again.
When testing your app in the emulator, you’ll be prompted to create an account with email and password. Even if you use your university email address, your account with the game service will not be linked to Shibboleth. For your security, do not reuse your Active Directory (NetID) password here.
5.2. Games Lists
Now we’ll make the main activity display invitations and ongoing games. When the app is complete, it will be possible to invite players to new multiplayer games and set their role: either an observer or a player on one of up to four teams. In addition to the fact that they’ve been invited to a game, players would want to know who invited them and in what capacity they would participate.
Open the activity_main.xml layout resource file and add some views to hold game information:
-
Add some kind of container (vertical
LinearLayoutsuggested) with IDinvitationsGroupinside the providedLinearLayout. -
Inside that group, add a
TextViewlabel displaying the word Invitations. -
Also inside that group, add a vertical
LinearLayoutwith IDinvitationsList. We’re not going to put anything inside this in the UI designer—it’ll be populated at runtime with invitation entries. -
In the outermost, provided
LinearLayout, add some kind of container with IDongoingGamesGroup. -
Inside that group, add a label displaying the phrase Ongoing Games.
-
Also inside that group, add a vertical
LinearLayoutwith IDongoingGamesList. LikeinvitationsList, it should remain empty here.
Update MainActivity to immediately request the games list from the server when it starts.
Refer to the Our API Documentation section above for the request endpoint and result format.
Until the request completes (that is, initially) the invitations and ongoing games groups should
have "gone" visibility. When the response is received, populate the games list LinearLayouts
with one chunk/row per game. We have provided the empty chunk_ongoing_game.xml layout resource
to which you can add repeatable game information UI. While you could use that some chunk for
both invitations and ongoing games, it will be useful for the next section to add a
chunk_invitations.xml layout resource for invitations specifically.
Entries for games to which the user has a pending invitation should
be in invitationsList. The invitationsGroup container should be gone if there are no
pending invitations.
Entries for games the user is currently involved in and that have not ended
should be in ongoingGamesList. Both kinds of entries should display the game owner’s email,
the game mode ("target mode" or "area mode"), and the user’s role/team name
5
in labels.
Games that have ended are considered "historical" and should not be displayed in
either of the required games lists, but you are welcome to add a third group and list for them.
We will also accept an optional chunk_historical_game.xml layout for holding repeatable
historical game UI.
To test your games list UI in the emulator even though it’s not possible to create invitations, we have set up a web site where you can sign in to the game service (with the same credentials you use for the app) and make virtual players invite you to games with a random mode and role.
5.3. Invitation/Game Buttons
To allow the user to respond to invitations or leave games, we will need to make it possible to interact with the game information chunks.
To the invitation entries, add two buttons, one labeled Accept and one labeled Decline. Similarly, each ongoing game entry should have an Enter and a Leave button, except that Leave should be gone if the user is the owner/creator of that game—if a game’s owner left, the game could no longer be controlled. Pressing Accept, Decline, or Leave should send the appropriate web request to inform the server of the user’s decision. Once that request completes, the games list should be fetched again and the UI should be updated so that the user sees that their decision took effect.
To confirm that these buttons and web requests are working, you can use the invitation testing site. The "invitation status" column will update immediately when you respond to an invitation or leave a game created by a virtual player.
When the app is done, pressing the Enter button on an ongoing game will enter that game,
showing the map and putting the user into active gameplay. Multiplayer games aren’t implemented
yet, but we can set up the intent in advance. Make clicking an Enter button launch GameActivity
with that game’s unique ID (a string) in the game extra.
6. Grading
MP2 is worth 100 points total, broken down as follows:
-
5 points for making
LaunchActivitythe startup activity -
20 points for the login flow
-
25 points for the games lists
-
20 points for the invitation response buttons
-
10 points for the enter-game intent
-
10 points for having no
checkstyleviolations -
10 points for submitting code that earns at least 40 points by 8 PM on your early deadline day
6.1. Test Cases
Unlike previous checkpoints, Checkpoint 2 has no purely computational functions—everything
you do here makes the app do something. Therefore, the test suite doesn’t call your functions
with selected inputs or directly check their return values; it instead tries interacting with
your app in a simulated Android environment. While fully understanding how Checkpoint2Test
works is not expected, reading the assertions it makes may help you understand what exactly
the tests are looking for.
6.2. Style Points
Proper style continues to constitute 10% of your grade.
Android Studio and checkstyle may have different opinions on how much handlers
should be indented when passed as parameters to functions like WebApi.startRequest.
If the default indentation level does not satisfy checkstyle, you can select a chunk of code
and use Shift+Tab to remove one level of indentation or Tab to add one level.
Alternatively, you can select some of the spaces at the beginning of the line and press Delete
to remove them without Android Studio trying to put them back.
6.3. Submitting Your Work
As before, submitting your work requires committing and pushing the files you modified/added. You can review the submitting portion of our Git workflow.
7. Cliffhanger
It is somewhat common in larger projects for a feature to not be very useful to the application overall until several pieces of functionality are in place. While the app can show and respond to invitations after you complete Checkpoint 2, there is no way to actually create or invite anyone to a multiplayer game. Checkpoint 3 will make it possible to configure multiplayer games and send invitations.
8. Cheating
The cheating policies in the syllabus continue to apply. Do not submit work done by anyone else or share your MP code with others.